Oh for years now I’ve been enviously eyeing up peoples neat raised beds and gravel paths! I have always wanted some, but have always secretly wondered whether they were slightly a waste of space. All those paths could be another row of peas etc etc. The plus points to having raised beds are having improved soil structure, little digging, and being able to cram more crops in per sq meter.
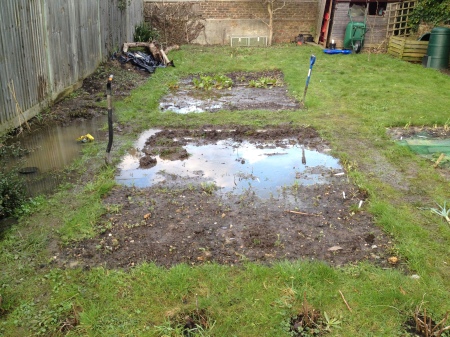
I could never justify the cost and effort in my previous gardens, it felt like if I did install raised beds it would be purely aesthetic. This time it’s different though, my garden is on heavy clay and floods. When I’ve looked out of the window lately since the snow has melted, I’ve been a bit desperate to know how to conquer the problem to be honest. I could have moved the vegetable garden entirely, but that would mean months of lifting turf would have been in vain, and I couldn’t see where I could rehouse the patch where it would still get good sunlight for most of the year.
I have come to the conclusion the only option is to raise the soil level, so at last I have a real reason to make a raised bed. Now the next challenge, I have never made one before, nor do I know if I’m capable! I’m not terrible good at being accurate when it comes to woodwork, so I had visions of me swearing as I discovered each plank to be too short, or the nails wouldn’t drive in. I had a quick look online for a tutorial, and was so pleased to have come across this one from Gardener’s world.
So simple! really who couldn’t make a bed like that 😮 Inspired by this video I arranged for a local scaffolder to drop off some old boards, and went out to buy the extra bits, like corner posts and nails. That’s really all you need.

I measured the boards by eye, by laying them over the existing vegetable patch, marking out two long and two short sides. Then I measure the thickness of the board, and added another half (to allow for what gets driven underground) for the corner posts.
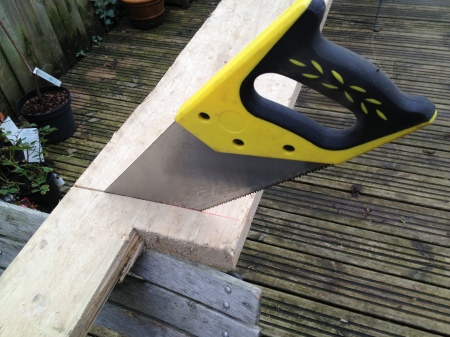
I sawed all the wood and then used a spade to loosen the soil around the edge of the vegetable bed. My soil was very wet so this wasn’t difficult!
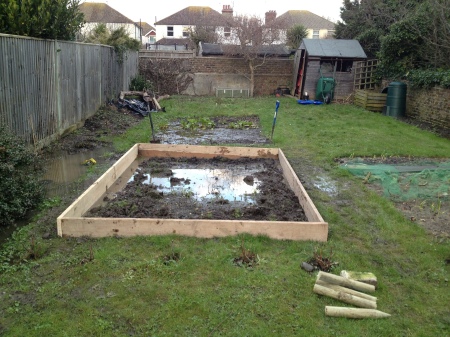
I then laid the planks around the bed, slightly overlapping the edges to allow the nails to be hammered in. Next I hammered in the corner posts, and hammered nails all around the connecting edges, and into the corner posts for extra security. I then filled with a mixture of grit, topsoil, compost (bought and homemade) and manure. The bed size is 3.5m x 2m, which is very large, but I plan to intersect with a couple of boards so I can get in to weed and plant.

I still need to top it up further, but I thought I’d leave it until nearer the time I’m planning to plant, then leave for a couple of weeks to settle, because the soil level will drop a bit by then.

Here I am feeling very proud of my achievement! (apologies for the poor quality of the photos, they are mobile shots at dusk) I hope it’s not pride before a fall and this really does solve the flood problem. I will only use this bed for summer planting for this reason, as the two right beds don’t seem to get so much water.
Well now, one down another three raised beds to go, oh and some paths to gravel!

 I’m pleased how this part of the garden is looking now, much better than it did in December with the floods, but the most important thing will be to see how much improved the system is at growing vegetables. It will be interesting to note the comparison to last year as the season progresses. I’m hoping the raised beds will speed things up a little as I noticed the clay took a long time to warm last year, so even though seeds germinated (albeit slowly) they stalled for a while and didn’t get going for quite some time. Bearing in mind we had the wettest year on record too!
